

"How do put avchd videos onto the windows dvd maker? I need to make a very important video for my family and im at a loss. im guess its not the right format or something because when i try to add it it wont accept. what should i do please be thorough im not very tech savy."
This is a problem from Yahoo Answers. Before answering the question, it is necessary for us to know what video formats can be supported by Windows DVD Maker.
According to its official website, the following files can be supported by Windows DVD Maker:
- Video files: .asf, .avi, .wmv
- Movie files: MPEG1, .mpeg, .mpg, .m1v, .mp2
- Audio files: .wav, .snd, .au, .aif, .aifc, .aiff
- Windows Media files: .asf, .wm, .wma, .wmv
- Still images: .bmp, .jpg, .jpeg, .jpe, .jfif, .gif
- MP3 format audio: .mp3
From the above statement, it is maybe not so hard to see that, the most common used video formats in Windows DVD Maker are AVI, WMV, MPG or ASF files. Therefore, it is maybe impossible for you to import AVCHD to Windows DVD Maker for DVD buring.
Lucky, we get AVCHD to Windows DVD Maker Converter which can fast and best convert Sony, Canon, Panasonic, JVC AVCHD MTS files to Windows DVD Maker editable files. Besides, it is also able to convert other videos such as MOV, MP4, FLV, 3GP, MKV, VOB, RMVB, MOD, TOD, MXF, XAVC, Tivo etc to Windows DVD Maker workable files.
Step by step to convert AVCHD to Windows DVD Maker
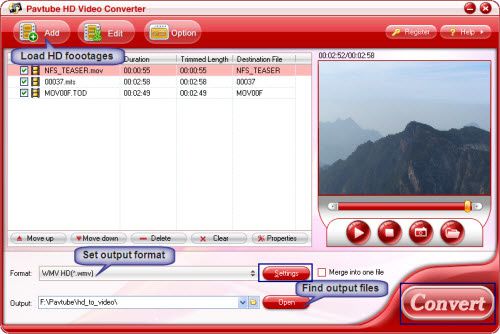
Step 1: Import AVCHD videos
Click “Add” to load the AVCHD videos, or directly drag the files into file list
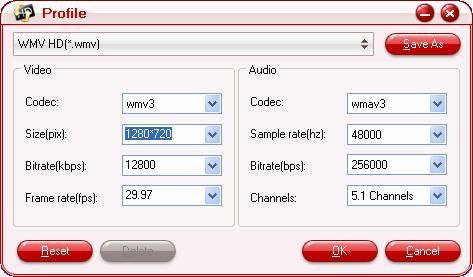
Step 2. Adjusting audio and video settings
Click “Settings” to customize advanced audio and video parameters. Now that we are converting HD files (MTS, MOV, TOD) for burning with Windows DVD Maker, you may click on the format bar and follow HD Video->HD WMV/ AVI/ MPEG-2 and then customize the advanced video and audio parameters.
Step 3. Converting AVCHD to Windows DVD Maker supported formats
Click “Convert” button to convert AVCHD to compatible formats for Windows DVD Maker.
Tips: You can also use a DVD Maker to directly burn video to DVD, Mac users can turn to Mac DVD Maker for DVD creating on Mac.
Extended Reading: Import video to Windows DVD Maker
After conversion you can burn the converted videos with Windows DVD Maker now:
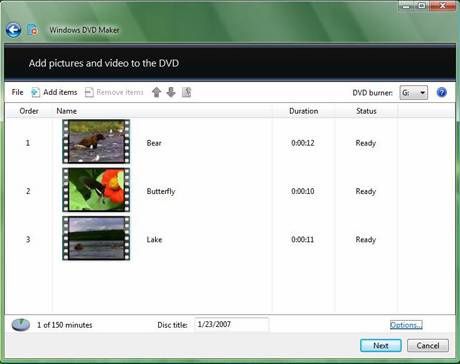
Step 1. Click the "Start" button and select "Windows DVD Maker" to run the program, then click the "Add items" button from the top menu and browse to the folder were the movies you want to burn are located. By default, they should be found in the"Videos" folder.
Step 2. Select the videos you want to burn and type the "Disc title". Also, you may select the order in which the movies will be saved on DVD. To dothat, select a movie and press the "Up" or "Down" button to change its order.
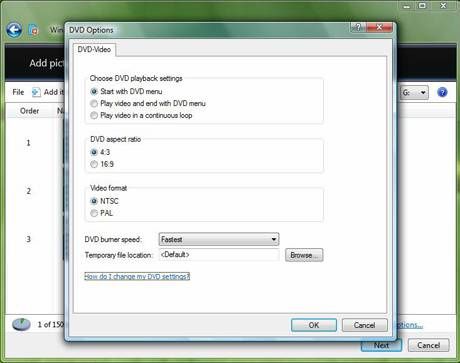
Step 3. If you want to, you can click the "Options" button and set things like the burning speed, the aspect ratio, the video format or you can choose if the DVD will have a menu or not. After you finished making the settings you want, click the "OK" button and then "Next".
Step 4. At this step you can create a custom DVD menu or you can select a predefined one. To select a predefined menu, scroll the "Menu Styles" list and select the one you like most. You can customize it by pressing the "Customize Menu" button and making the settings you want. Also, you can change the menu text by clicking the "Menu text" button and typing the text you want for each button.
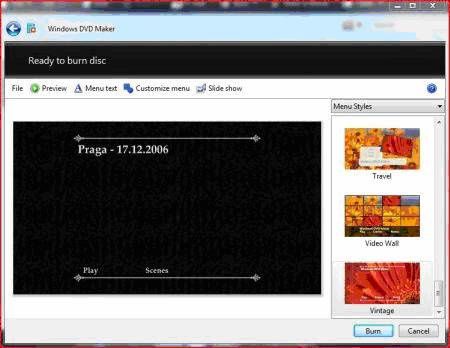
Step 5. When you have finished making all the customizations, click the "Burn" button.
First, Windows DVD Maker will encode the movie in the appropriate format and then it will burn it on DVD. Usually, the encoding process takes much more time than the burning so you have to be patient.